使用VC++ ATL实现Office的COM插件[组图]
本文介绍了一种使用VC++ ATL(Active Template Library),利用IDTExtensibility2接口,为Microsoft Word加入功能简单的COM插件(addin),加入工具栏按钮和菜单等可视部件,并为其加入响应事件的方法,并在最后简单说明了实现与Office宏混合编程的方法。
说到Office相关的编程,大家首先想到的可能是VBA(Visual Basic for Application),事实上, ATL也是一种很好的工具。这里介绍的就是一种基于ATL的Office编程方法,实现的功能很简单,仅仅是一个示例,步骤如下:
1、在visual C++编程环境下,利用向导生成一个名为WordAddin的ATL COM Appwizard工程:
在向导的第一个对话框中server type单选框选择默认的服务器类型Dynamic Link Library(DLL),下面的三个复选框中选择Allow merging of proxy-stub code选项。然后单击Finish,这样一个空的ATL project就产生了(如图 一)。
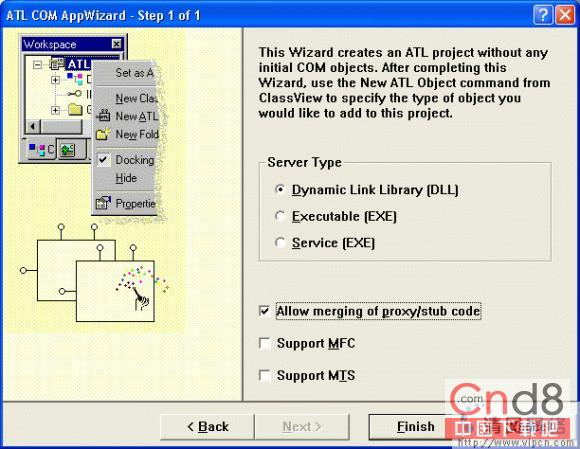 点击查看大图
图一
2、插入我们的ATL object:
选择菜单Insert―>Insert new ATL object,出现new ATL object向导对话框,左边的category列表中选择object,右边相应的选择simple object,单击下一步(Next)(如图 二):
图二
在第二个对话框names属性页的“Short Name:”中填入Addin(如图三):
图三
在Attribute属性页中,选中Support IsupportErrorInfo复选框,单击OK(如图四):
图四
这样就产生了一个类名为WordAddin的ATL COM object,编译(build)该工程看是否一切正常。
2、用IDTExtensibility2实现CAddin类:
IDTExtensibility2是定义在MSADDin Designer typelibrary(MSADDNDR.dll/MSADDNDR.tlb)中的库文件,该文件一般在C:Program Files/Common Files/Designer目录下。IDTExtensibility2 库提供了 5 个可用来操纵插件以及宿主应用程序的事件: OnConnection、OnDisconnection、OnAddInsUpdate、OnStartupComplete 和 OnBeginShutdown。这些事件的具体功能和用法可查阅MSDN。用向导来实现IDTExtensibility2接口:切换到classview页,右键点击Caddin类,在弹出的菜单中选择Implement Interface,出现Implement Interface对话框,选择Add Tylpelib按钮(如图 五):

图五
(单击OK,)在出现的Browse Typelibraries对话框中选择Microsoft Add-in Designer(1.0) (如图六):
图六
单击OK,在AddinDesigNerobjects属性页中选择IDTExtensibility2(如图七):
图七
再单击OK。这样向导就在ATL COM object中添加了IDTExtensibility2的5个具体事件,并对他们进行了一些默认的初始设置,同时还更新了COM_INTERFACE_MAP()。
4、注册插件到它的宿主程序:
打开文件视图FileView―>Resource File中的Addin.rgs文件,加入以下代码:
HKCU
{
Software
{
Microsoft
{
Office
{
Word
{
Addins
{
'WordAddin.Addin'
{
val FriendlyName = s 'WORD Custom Addin'
val Description = s 'Word Custom Addin'
val LoadBehavior = d '00000003'
val CommandLineSafe = d '00000001'
}
}
}
}
}
}
}
5、重新编译(build)该工程注册我们的插件。
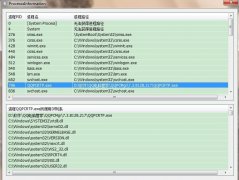
6、运行,选择Executable File为word 2000,注重要选择正确的路径,假如运行成功,则插件已经加入到word中。
7、给插件添加菜单和按钮:
这里简单的介绍一下Office 的命令条:在Office中,菜单栏、工具栏和弹出式菜单都叫做命令条(Command Bar对象)。所有这些种类的命令条中都可以包括其他命令条和不限数量的控件,如相对工具栏这个命令条而言,按钮就是它的控件。有的控件(如菜单)本身又是命令条,可以多级嵌套。所有的命令条可用一个CommandBars集合控制。CommandBars集合是一个通用的可共享且可编程的对象,通过它的Add()方法可以为其添加一个CommandBar 对象(即命令条),而每个 CommandBar 对象都有一个CommandBarControls 集合,这个集合里包含了这个命令条里的所有控件。使用 CommandBar 对象的 Controls 属性可引用命令条中的控件。
现在给word加入一个工具条及其按钮和一个菜单:
首先在工程中加入office和Word的类型库,在stdafx.h文件中加入以下代码:
#import "C:Program FilesMicrosoft OfficeOfficemso9.dll"
rename_namespace("Office") named_guids
using namespace Office;
#import "C:Program FilesMicrosoft OfficeOfficeMSOUTL9.olb"
rename_namespace("Word"), raw_interfaces_only, named_guids
using namespace Outlook;
注重:一定要把路径改为和office的安装路径一致。
在Word对象模型中,Application对象是代表整个工程的最高级对象,我们可以用它的GetCommandBars方法得到CommandBars对象,由于CommandBars对象是Word所有工具条和菜单项的集合,所以就可以通过调用它的Add方法添加新的工具条。然后为工具条添加新的按钮,其实方法一样简单,我们可以调用CommandBar的GetControls方法得到工具条的CommandBarControls集合,如前所说,CommandBarControls集合是该工具条所有控件的集合,按钮自然是其中之一,那么接下来我们就可以通过调用CommandBarControls集合的Add方法添加一个新的按钮了。下面是具体的实现代码:
CComQIPtr<_Application> spApp(Application);
ATLASSERT(spApp);
m_spApp = spApp;
HRESULT hr = AppEvents::DispEventAdvise(m_spApp);
if(FAILED(hr))
return hr;
CComPtr <Office::_CommandBars> spCmdBars;
CComPtr <Office::CommandBar> spCmdBar;
hr = m_spApp->get_CommandBars(&spCmdBars);
if(FAILED(hr))
return hr;
ATLASSERT(spCmdBars);
// now we add a new toolband to Word
// to which we'll add 2 buttons
CComVariant vName("WordAddin");
CComPtr spNewCmdBar;
// position it below all toolbands
//MsoBarPosition::msoBarTop = 1
CComVariant vPos(1);
CComVariant vTemp(VARIANT_TRUE); // menu is temporary
CComVariant vEmpty(DISP_E_PARAMNOTFOUND, VT_ERROR);
//Add a new toolband through Add method
// vMenuTemp holds an unspecified parameter
//spNewCmdBar points to the newly created toolband
spNewCmdBar = spCmdBars->Add(vName, vPos, vEmpty, vTemp);
//now get the toolband's CommandBarControls
CComPtr < Office::CommandBarControls> spBarControls;
spBarControls = spNewCmdBar->GetControls();
ATLASSERT(spBarControls);
//MsoControlType::msoControlButton = 1
CComVariant vToolBarType(1);
//show the toolbar?
CComVariant vShow(VARIANT_TRUE);
CComPtr <Office::CommandBarControl> spNewBar;
CComPtr <Office::CommandBarControl> spNewBar2;
// add first button
spNewBar = spBarControls->Add(vToolBarType,vEmpty,vEmpty,vEmpty,vShow);
ATLASSERT(spNewBar);
// add 2nd button
spNewBar2 = spBarControls->Add(vToolBarType,vEmpty,vEmpty,vEmpty,vShow);
ATLASSERT(spNewBar2);
_bstr_t bstrNewCaption(OLESTR("Item1"));
_bstr_t bstrTipText(OLESTR("Tooltip for Item1"));
// get CommandBarButton interface for each toolbar button
// so we can specify button styles and stuff
// each button displays a bitmap and caption next to it
CComQIPtr < Office::_CommandBarButton> spCmdButton(spNewBar);
CComQIPtr < Office::_CommandBarButton> spCmdButton2(spNewBar2);
ATLASSERT(spCmdButton);
m_spButton = spCmdButton;
ATLASSERT(spCmdButton2);
// to set a bitmap to a button, load a 32x32 bitmap
// and copy it to clipboard. Call CommandBarButton's PasteFace()
// to copy the bitmap to the button face. to use
// Word's set of predefined bitmap, set button's FaceId to //the
// button whose bitmap you want to use
HBITMAP hBmp =(HBITMAP)::LoadImage(_Module.GetResourceInstance(),
MAKEINTRESOURCE(IDB_BITMAP1),IMAGE_BITMAP,0,0,LR_LOADMAP3DCOLORS);
// put bitmap into Clipboard
::OpenClipboard(NULL);
::EmptyClipboard();
::SetClipboardData(CF_BITMAP, (HANDLE)hBmp);
::CloseClipboard();
::DeleteObject(hBmp);
// set style before setting bitmap
spCmdButton->PutStyle(Office::msoButtonIconAndCaption);
hr = spCmdButton->PasteFace();
if (FAILED(hr))
return hr;
spCmdButton->PutVisible(VARIANT_TRUE);
spCmdButton->PutCaption(OLESTR("Item1"));
spCmdButton->PutEnabled(VARIANT_TRUE);
spCmdButton->PutTooltipText(OLESTR("Tooltip for Item1"));
spCmdButton->PutTag(OLESTR("Tag for Item1"));
spCmdButton2->put_OnAction(OLESTR("MYMacro1"));
//show the toolband
spNewCmdBar->PutVisible(VARIANT_TRUE);
spCmdButton2->PutStyle(Office::msoButtonIconAndCaption);
//specify predefined bitmap
spCmdButton2->PutFaceId(1758);
spCmdButton2->PutVisible(VARIANT_TRUE);
spCmdButton2->PutCaption(OLESTR("Item2"));
spCmdButton2->PutEnabled(VARIANT_TRUE);
spCmdButton2->PutTooltipText(OLESTR("Tooltip for Item2"));
spCmdButton2->PutTag(OLESTR("Tag for Item2"));
spCmdButton2->PutVisible(VARIANT_TRUE);
spCmdButton2->put_OnAction(OLESTR("MYMacro2"));
添加菜单项的过程与之相类似:
首先通过调用CommandBars集合的get_ActiveMenuBar()方法得到一个CommandBar对象,这个对象代表当前的工程中的活动菜单,然后调用CommandBar的GetControls得到当前菜单的控件集合。尝试在Word的“格式”菜单(第5个菜单)中加入新的菜单项,调用CommandBarControls的GetItem(5)得到需要的“格式”菜单项,它也是一个CommandBarControls集合,(前面曾经提到,控件集是可以嵌套的),这样就可以通过调用它的Add方法添加新的菜单项了。具体的实现代码如下:
_bstr_t bstrNewMenuText(OLESTR("New Menu Item"));
CComPtr < Office::CommandBarControls> spCmdCtrls;
CComPtr < Office::CommandBarControls> spCmdBarCtrls;
CComPtr < Office::CommandBarPopup> spCmdPopup;
CComPtr < Office::CommandBarControl> spCmdCtrl;
// get CommandBar that is Word's main menu
hr = spCmdBars->get_ActiveMenuBar(&spCmdBar);
if (FAILED(hr))
return hr;
// get menu as CommandBarControls
spCmdCtrls = spCmdBar->GetControls();
ATLASSERT(spCmdCtrls);
// we want to add a menu entry to Outlook's 6th(Tools) menu //item
CComVariant vItem(5);
spCmdCtrl= spCmdCtrls->GetItem(vItem);
ATLASSERT(spCmdCtrl);
IDispatchPtr spDisp;
spDisp = spCmdCtrl->GetControl();
// a CommandBarPopup interface is the actual menu item
CComQIPtr < Office::CommandBarPopup> ppCmdPopup(spDisp);
ATLASSERT(ppCmdPopup);
spCmdBarCtrls = ppCmdPopup->GetControls();
ATLASSERT(spCmdBarCtrls);
CComVariant vMenuType(1); // type of control - menu
CComVariant vMenuPos(6);
CComVariant vMenuEmpty(DISP_E_PARAMNOTFOUND, VT_ERROR);
CComVariant vMenuShow(VARIANT_TRUE); // menu should be visible
CComVariant vMenuTemp(VARIANT_TRUE); // menu is temporary
CComPtr < Office::CommandBarControl> spNewMenu;
// now create the actual menu item and add it
spNewMenu = spCmdBarCtrls->Add(vMenuType, vMenuEmpty, vMenuEmpty,
vMenuEmpty, vMenuTemp);
ATLASSERT(spNewMenu);
spNewMenu->PutCaption(bstrNewMenuText);
spNewMenu->PutEnabled(VARIANT_TRUE);
spNewMenu->PutVisible(VARIANT_TRUE);
//we'd like our new menu item to look cool and display
// an icon. Get menu item as a CommandBarButton
CComQIPtr < Office::_CommandBarButton> spCmdMenuButton(spNewMenu);
ATLASSERT(spCmdMenuButton);
spCmdMenuButton->PutStyle(Office::msoButtonIconAndCaption);
// we want to use the same toolbar bitmap for menuitem too.
// we grab the CommandBarButton interface so we can add
// a bitmap to it through PasteFace().
spCmdMenuButton->PasteFace();
// show the menu
spNewMenu->PutVisible(VARIANT_TRUE);
return S_OK;
这时运行程序,可以看到添加的按钮和菜单项已经出现在Word中,还需要为其加入响应事件,这样才能真正的通过插件扩展Word的功能。
8、为我刚加入的按钮加入其响应事件:
ATL为COM对象的Idispatch接口提供了两个模板类:IDispEventImpl<>和IDispEventSimpleImpl<>,选择IDispEventSimpleImpl<>,因为它不需要额外的类型库信息,从IDispEventSimpleImpl<>继续一个类:
class ATL_NO_VTABLE CAddin :
public CComObjectRootEx < CComSingleThreadModel>,
.....
public IDispEventSimpleImpl<1,CAddin,
&__uuidof(Office::_CommandBarButtonEvents>
声明按钮点击事件的回调函数:
void __stdcall OnClickButton(Idispatch * /*Office::_CommandBarButton**/ Ctrl,VARIANT_BOOL * CancelDefault);
用_ATL_SINK_INFO结构描述回调的参数信息:打开CAddin.h文件,在其最上加入以下声明:
extern _ATL_FUNC_INFO OnClickButtonInfo;(注重一定声明为外部变量)
然后打开CAddin.cpp文件为其加入以下定义:
_ATL_FUNC_INFO OnClickButtonInfo ={CC_STDCALL,VT_EMPTY,2,{VT_DISPATCH,VT_BYREF VT_BOOL}};
加入按钮点击事件的具体实现:
void __stdcall CAddin::OnClickButton(IDispatch*
/*Office::_CommandBarButton* */ Ctrl,
VARIANT_BOOL * CancelDefault)
{
USES_CONVERSION;
CComQIPtr pCommandBarButton(Ctrl);
//the button that raised the event. Do something with this...
MessageBox(NULL, "Clicked Button1", "OnClickButton", MB_OK);
}
在接口映射宏中加入以下信息:
BEGIN_SINK_MAP(CAddin)
SINK_ENTRY_INFO(1, __uuidof(Office::_CommandBarButtonEvents),
/*dispid*/ 0x01,
OnClickButton, &OnClickButtonInfo)
END_SINK_MAP()
最后在分别在CAddin 类的 OnConnection() 和OnDisconnection()中调用DispEventAdvise() 和 DispEventUnadvise()连接和断开连接消息来源。
到这里就实现了一个简单的COM插件,运行程序,点击工具栏上新加入的按钮,就可以弹出("Clicked Button1")消息框。
假如熟悉VBA编程,就可以把编写的宏作为按钮响应事件,只需调用按钮的put_OnAction()方法:
spCmdButton->put_OnAction(OLESTR("YourMacroName"));
- 上一篇:数据结构学习(C++)之稀疏矩阵
- 下一篇:实现目录树菜单