
JBuilderX+SQL Server开发hibernate[组图]
环境: 开发的IDE:JBuilderX 使用的数据库:MS SQL Server 2000 使用的数据库驱动:JSQL Driver(JDBC 3.0) 说明: !-- frame contents -- !-- /frame contents -- 1、hibernate在配置文件中明确说明“Microsoft D
环境:
开发的IDE:JBuilderX
使用的数据库:MS SQL Server 2000
使用的数据库驱动:JSQL Driver(JDBC 3.0)
说明:
![]()
![]()
![]()
![]() <!-- frame contents -->
<!-- /frame contents -->
<!-- frame contents -->
<!-- /frame contents -->![]()
![]()
![]()
![]() 1、hibernate在配置文件中明确说明“Microsoft Driver (not recommended!)”,因此先使用JSQL Driver。
1、hibernate在配置文件中明确说明“Microsoft Driver (not recommended!)”,因此先使用JSQL Driver。
2、JSQL Driver可以到http://www.jnetdirect.com中得到,需要先注册个用户,才能下载到试用的版本。
3、JDBC3.0只能在JDK1.4及以上版本中使用,JBuilderX默认的是JDK1.4
预备工作:
1、下载Hibernate,目前最高版本是2.1.2
2、在JBuilder中创建一个lib,起名为hibernate_full,将hibernatelib下的所有jar通通放进去,并将hibernatehibernate2.jar也放进去
3、在JBuilder中创建一个lib,起名为JSQL3,将JSQL Driver下的JNetDirectJSQLConnectJDBC_3.0_DriverJSQLConnect.jar放进去
开始进行例子:
1、创建一个project,命名为testhibernate
2、在属性里的Required Libraries里加入hibernate_full和JSQL3
3、在菜单Project --> Project Properties --> Build --> Resource 里选中XML文件,选择“Copy” --在编译该项目的时候,会自动将src文件夹里的xml文件拷贝到classes文件夹里的相应目录下
4、在testhibernate项目中创建一个src目录
5、将hibernate源文件里的hibernatesrchibernate.properties 和 log4j.properties拷贝到testhibernate项目中的src目录下
6、修改hibernate.properties中关于MS Sql Server 2000驱动方面的配置
找到
## HypersonicSQL
hibernate.dialect net.sf.hibernate.dialect.HSQLDialect
hibernate.connection.driver_class org.hsqldb.jdbcDriver
hibernate.connection.username sa
hibernate.connection.passWord
hibernate.connection.url jdbc:hsqldb:hsql://localhost
hibernate.connection.url jdbc:hsqldb:test
hibernate.connection.url jdbc:hsqldb:.
这段,这里是说默认的是使用HypersonicSQL,我们使用的是MS Sql Server,因此将整段注释掉
## HypersonicSQL
#hibernate.dialect net.sf.hibernate.dialect.HSQLDialect
#hibernate.connection.driver_class org.hsqldb.jdbcDriver
#hibernate.connection.username sa
#hibernate.connection.password
#hibernate.connection.url jdbc:hsqldb:hsql://localhost
#hibernate.connection.url jdbc:hsqldb:test
#hibernate.connection.url jdbc:hsqldb:.
并且,找到
## MS SQL Server
#hibernate.dialect net.sf.hibernate.dialect.SQLServerDialect
#hibernate.connection.username sa
#hibernate.connection.password sa
## JSQL Driver
#hibernate.connection.driver_class com.jnetdirect.jsql.JSQLDriver
#hibernate.connection.url jdbc:JSQLConnect://1E1/test
这段,比如我们使用的数据库服务器机器名为yuj,数据库名为testhi,连接到数据库上去的用户名为sa,密码为sa,则修改后这段成为
## MS SQL Server
hibernate.dialect net.sf.hibernate.dialect.SQLServerDialect
hibernate.connection.username sa
hibernate.connection.password sa
## JSQL Driver
hibernate.connection.driver_class com.jnetdirect.jsql.JSQLDriver
hibernate.connection.url jdbc:JSQLConnect://yuj/testhi
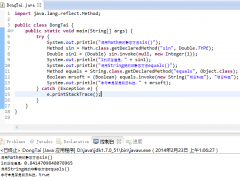
7、创建一个类testhibernate.Person,这是个标准的JavaBean,只有3个属性和相应的getset方法
package testhibernate;
public class Person
{
private String id;
private String name;
private String address;
public void setId(String value)
{
this.id = value;
}
public String getId()
{
return id;
}
public void setName(String value)
{
this.name = value;
}
public String getName()
{
return name;
}
public void setAddress(String value)
{
this.address = value;
}
public String getAddress()
{
return address;
}
}
8、创建一个对象-关系映射的xml文件Person.hbm.xml,放在和Person.java相同的目录下面
<?xml version="1.0" encoding="GB2312"?>
<!DOCTYPE hibernate-mapping SYSTEM "http://hibernate.sourceforge.net/hibernate-mapping-2.0.dtd" >
<hibernate-mapping>
<class name="testhibernate.Person">
<!--hibernate为我们生成主键id-->
<id name = "id" unsaved-value = "null">
<generator class="uuid.hex"/>
</id>
<!--默认把类的变量映射为相同名字的表列,当然我们可以修改其映射方式-->
<property name="name"/>
<property name="address"/>
</class>
</hibernate-mapping>
9、创建调用类Person的客户端程序Client1.java
package testhibernate;
import net.sf.hibernate.Session;
import net.sf.hibernate.Transaction;
import net.sf.hibernate.SessionFactory;
import net.sf.hibernate.cfg.Configuration;
import net.sf.hibernate.tool.hbm2ddl.SchemaEXPort;
/**
*本类只是用来创建表的,并不往表内部插入任何数据,并且只能使用一次,否则会删除已有的表的
*/
public class Client1
{
private static SessionFactory sessionFactory;
public static void main(String[] args) throws Exception
{
Configuration conf = new Configuration().addClass(Person.class);
//第一次运行时用来在数据库中创建表
//并且把sql语句输出到txt文件用的
//以后的运行不能使用该段代码,否则每次都会先删除原表,再新建该表
SchemaExport dbExport = new SchemaExport(conf);
dbExport.setOutputFile("sql.txt");
dbExport.create(true, true);
}
}
package testhibernate;
import net.sf.hibernate.Session;
import net.sf.hibernate.Transaction;
import net.sf.hibernate.SessionFactory;
import net.sf.hibernate.cfg.Configuration;
import net.sf.hibernate.tool.hbm2ddl.SchemaExport;
public class Client2
{
private static SessionFactory sessionFactory;
public static void main(String[] args) throws Exception
{
Configuration conf = new Configuration().addClass(Person.class);
sessionFactory = conf.buildSessionFactory();
Session s = sessionFactory.openSession();
Transaction t = s.beginTransaction();
Person yuj = new Person();
yuj.setName("john");
yuj.setAddress("上海");
Person x = new Person();
x.setName("zhaoyh");
x.setAddress("上海");
//持久化
s.save(yuj); //此时yuj已经可以在数据库中找到
s.save(x); //此时x已经可以在数据库中找到
t.commit();
s.close();
}
}
查看数据库中,增加了2条记录,OK!初步使用成功了,剩下的慢慢研究吧……
开发的IDE:JBuilderX
使用的数据库:MS SQL Server 2000
使用的数据库驱动:JSQL Driver(JDBC 3.0)
说明:
2、JSQL Driver可以到http://www.jnetdirect.com中得到,需要先注册个用户,才能下载到试用的版本。
3、JDBC3.0只能在JDK1.4及以上版本中使用,JBuilderX默认的是JDK1.4
预备工作:
1、下载Hibernate,目前最高版本是2.1.2
2、在JBuilder中创建一个lib,起名为hibernate_full,将hibernatelib下的所有jar通通放进去,并将hibernatehibernate2.jar也放进去
3、在JBuilder中创建一个lib,起名为JSQL3,将JSQL Driver下的JNetDirectJSQLConnectJDBC_3.0_DriverJSQLConnect.jar放进去
开始进行例子:
1、创建一个project,命名为testhibernate
2、在属性里的Required Libraries里加入hibernate_full和JSQL3
3、在菜单Project --> Project Properties --> Build --> Resource 里选中XML文件,选择“Copy” --在编译该项目的时候,会自动将src文件夹里的xml文件拷贝到classes文件夹里的相应目录下
4、在testhibernate项目中创建一个src目录
5、将hibernate源文件里的hibernatesrchibernate.properties 和 log4j.properties拷贝到testhibernate项目中的src目录下
6、修改hibernate.properties中关于MS Sql Server 2000驱动方面的配置
找到
## HypersonicSQL
hibernate.dialect net.sf.hibernate.dialect.HSQLDialect
hibernate.connection.driver_class org.hsqldb.jdbcDriver
hibernate.connection.username sa
hibernate.connection.passWord
hibernate.connection.url jdbc:hsqldb:hsql://localhost
hibernate.connection.url jdbc:hsqldb:test
hibernate.connection.url jdbc:hsqldb:.
这段,这里是说默认的是使用HypersonicSQL,我们使用的是MS Sql Server,因此将整段注释掉
## HypersonicSQL
#hibernate.dialect net.sf.hibernate.dialect.HSQLDialect
#hibernate.connection.driver_class org.hsqldb.jdbcDriver
#hibernate.connection.username sa
#hibernate.connection.password
#hibernate.connection.url jdbc:hsqldb:hsql://localhost
#hibernate.connection.url jdbc:hsqldb:test
#hibernate.connection.url jdbc:hsqldb:.
并且,找到
## MS SQL Server
#hibernate.dialect net.sf.hibernate.dialect.SQLServerDialect
#hibernate.connection.username sa
#hibernate.connection.password sa
## JSQL Driver
#hibernate.connection.driver_class com.jnetdirect.jsql.JSQLDriver
#hibernate.connection.url jdbc:JSQLConnect://1E1/test
这段,比如我们使用的数据库服务器机器名为yuj,数据库名为testhi,连接到数据库上去的用户名为sa,密码为sa,则修改后这段成为
## MS SQL Server
hibernate.dialect net.sf.hibernate.dialect.SQLServerDialect
hibernate.connection.username sa
hibernate.connection.password sa
## JSQL Driver
hibernate.connection.driver_class com.jnetdirect.jsql.JSQLDriver
hibernate.connection.url jdbc:JSQLConnect://yuj/testhi
7、创建一个类testhibernate.Person,这是个标准的JavaBean,只有3个属性和相应的getset方法
package testhibernate;
public class Person
{
private String id;
private String name;
private String address;
public void setId(String value)
{
this.id = value;
}
public String getId()
{
return id;
}
public void setName(String value)
{
this.name = value;
}
public String getName()
{
return name;
}
public void setAddress(String value)
{
this.address = value;
}
public String getAddress()
{
return address;
}
}
8、创建一个对象-关系映射的xml文件Person.hbm.xml,放在和Person.java相同的目录下面
<?xml version="1.0" encoding="GB2312"?>
<!DOCTYPE hibernate-mapping SYSTEM "http://hibernate.sourceforge.net/hibernate-mapping-2.0.dtd" >
<hibernate-mapping>
<class name="testhibernate.Person">
<!--hibernate为我们生成主键id-->
<id name = "id" unsaved-value = "null">
<generator class="uuid.hex"/>
</id>
<!--默认把类的变量映射为相同名字的表列,当然我们可以修改其映射方式-->
<property name="name"/>
<property name="address"/>
</class>
</hibernate-mapping>
9、创建调用类Person的客户端程序Client1.java
package testhibernate;
import net.sf.hibernate.Session;
import net.sf.hibernate.Transaction;
import net.sf.hibernate.SessionFactory;
import net.sf.hibernate.cfg.Configuration;
import net.sf.hibernate.tool.hbm2ddl.SchemaEXPort;
/**
*本类只是用来创建表的,并不往表内部插入任何数据,并且只能使用一次,否则会删除已有的表的
*/
public class Client1
{
private static SessionFactory sessionFactory;
public static void main(String[] args) throws Exception
{
Configuration conf = new Configuration().addClass(Person.class);
//第一次运行时用来在数据库中创建表
//并且把sql语句输出到txt文件用的
//以后的运行不能使用该段代码,否则每次都会先删除原表,再新建该表
SchemaExport dbExport = new SchemaExport(conf);
dbExport.setOutputFile("sql.txt");
dbExport.create(true, true);
}
}
package testhibernate;
import net.sf.hibernate.Session;
import net.sf.hibernate.Transaction;
import net.sf.hibernate.SessionFactory;
import net.sf.hibernate.cfg.Configuration;
import net.sf.hibernate.tool.hbm2ddl.SchemaExport;
public class Client2
{
private static SessionFactory sessionFactory;
public static void main(String[] args) throws Exception
{
Configuration conf = new Configuration().addClass(Person.class);
sessionFactory = conf.buildSessionFactory();
Session s = sessionFactory.openSession();
Transaction t = s.beginTransaction();
Person yuj = new Person();
yuj.setName("john");
yuj.setAddress("上海");
Person x = new Person();
x.setName("zhaoyh");
x.setAddress("上海");
//持久化
s.save(yuj); //此时yuj已经可以在数据库中找到
s.save(x); //此时x已经可以在数据库中找到
t.commit();
s.close();
}
}
查看数据库中,增加了2条记录,OK!初步使用成功了,剩下的慢慢研究吧……
精彩图集

精彩文章